投稿画面ではなく、サイトのトップページなどにInstagramの投稿を表示させる方法です。
最終的にはInstagramで選んだ投稿を4つならべて表示することを目的としています。
普通にInstagramを埋め込む場合
Instagramのページから埋め込みコードをコピーする
Instagramのページを開き、埋め込みたい記事を開きます。
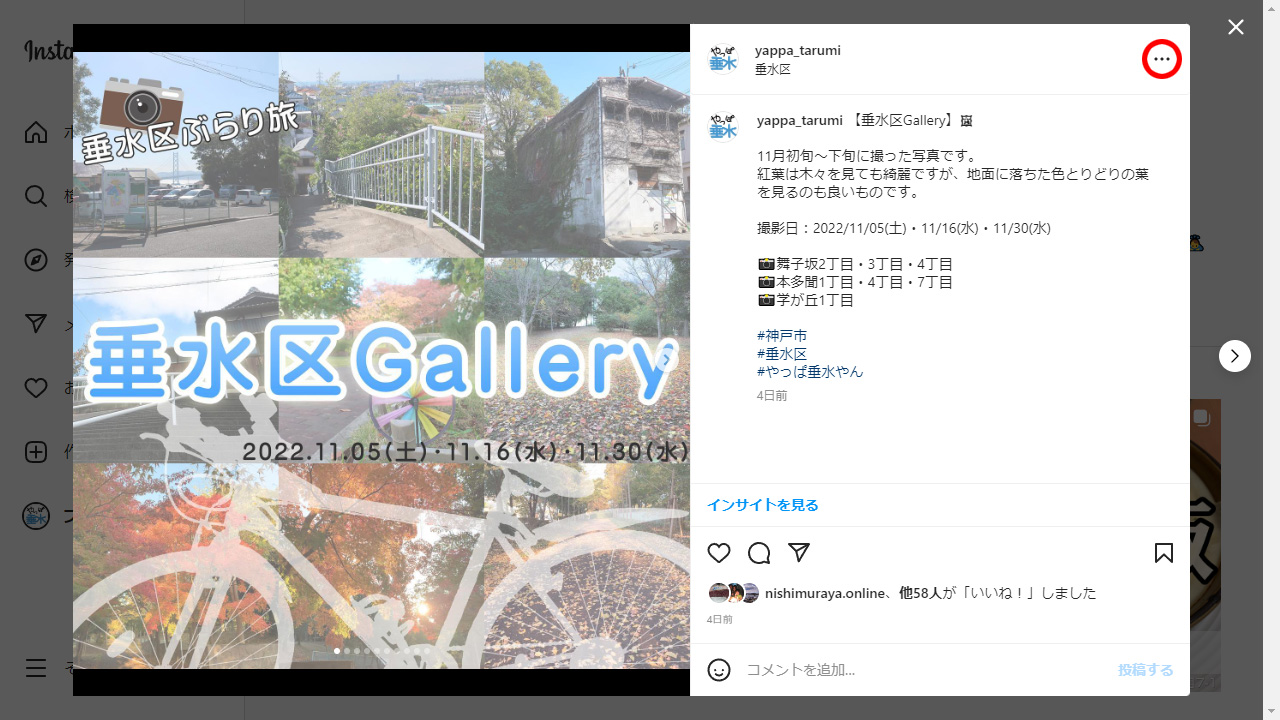
右上の「…」をクリックするとメニューが表示されるので、下から2段目の「埋め込み」をクリック。

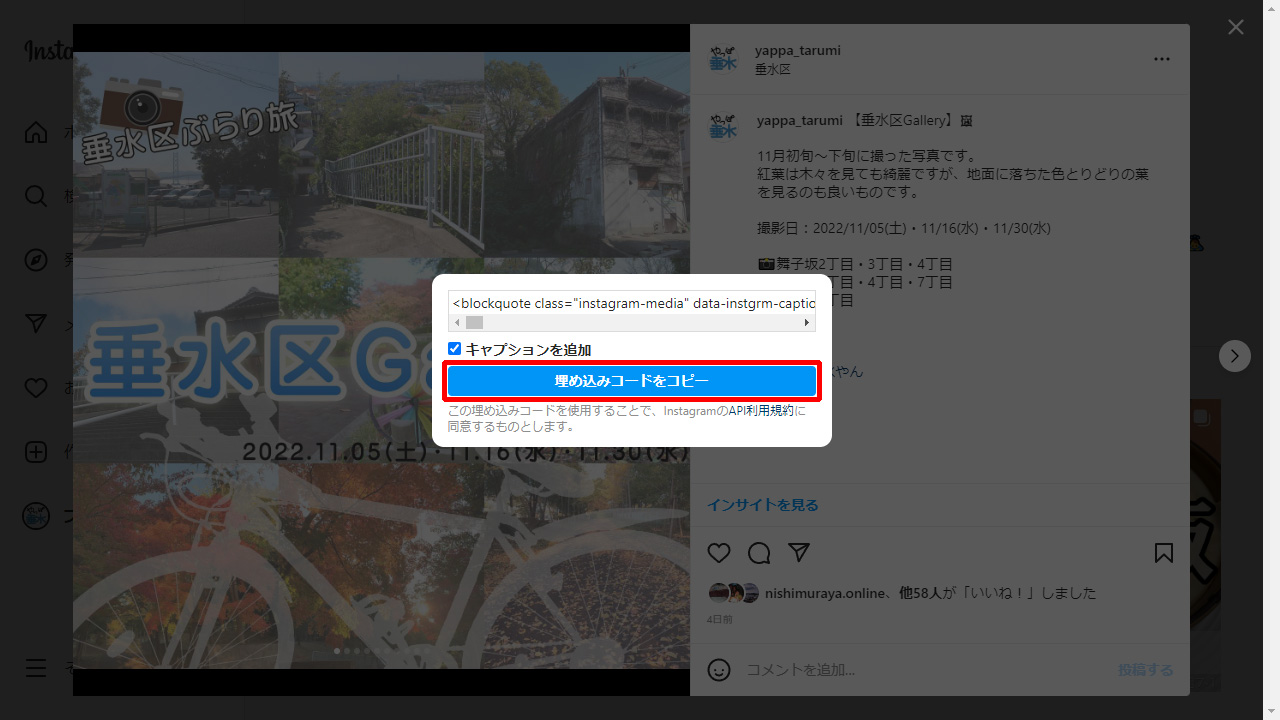
埋め込みコードが表示されるので、「埋め込みコードをコピー」をクリックしてコードをコピーします。
※キャプションを追加については後記。
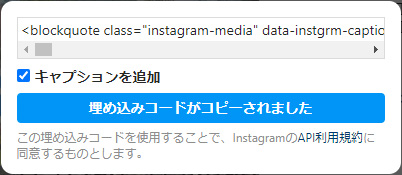
「埋め込みコードがコピーされました」と表示されたらInstagramのページは終了でWordPress側に移ります。
WordPressへ貼り付け
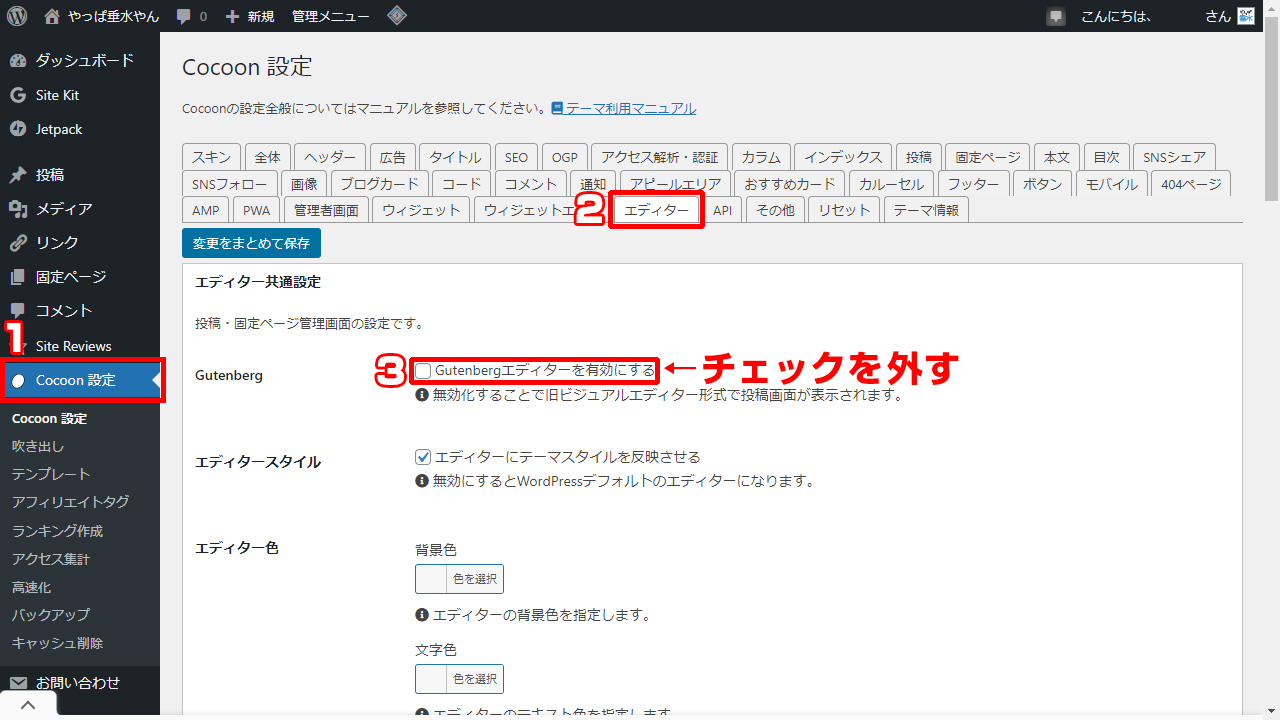
WordPressの投稿画面でエディターをテキストにします。
※Gutenbergではなく旧エディターを使用しています。
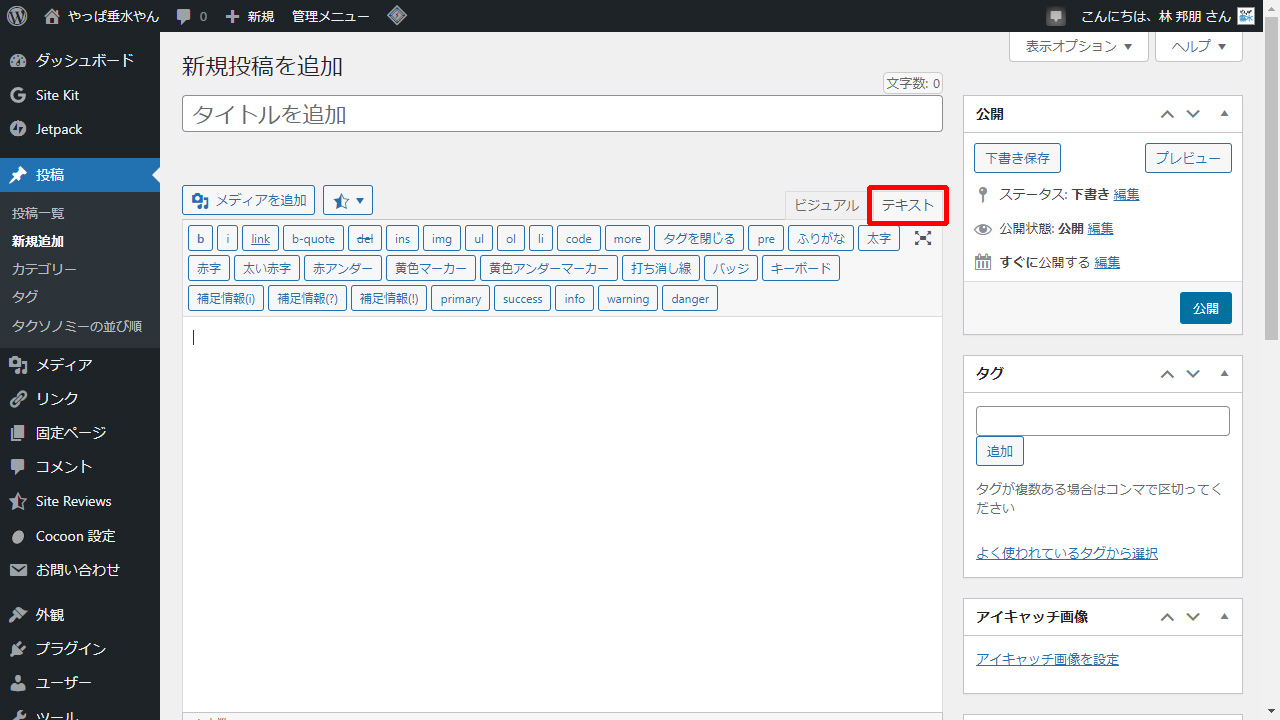
Cocoonの場合、設定1つで旧エディターに出来ます。
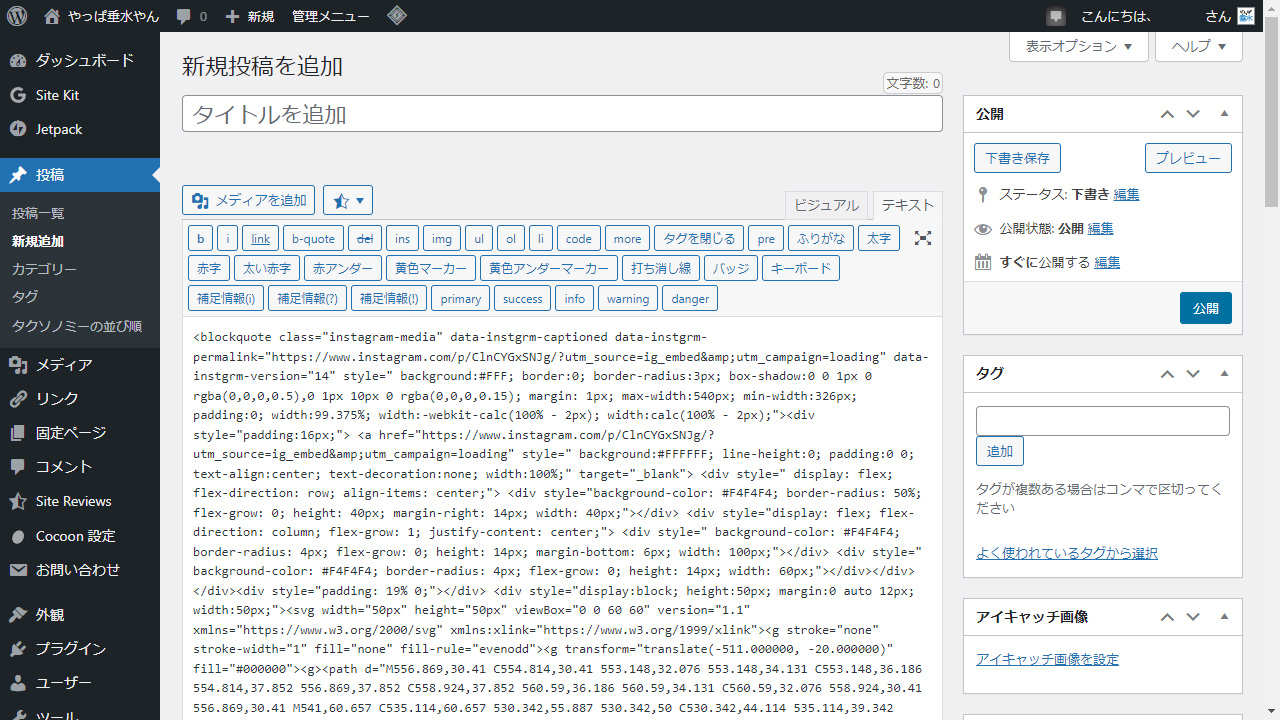
Instagramでコピーした埋め込みコードを貼り付けると、とんでもなく長いコードになっていますが問題ありません。
「キャプションを追加」にチェックを入れた場合(有りの場合)
埋め込みコードを「キャプションを追加」にチェックを入れた場合、入力したキャプション(文章)が全て表示されます。
「キャプションを追加」にチェックを入れなかった場合(無しの場合)
「キャプションを追加」のチェックを外した場合は、キャプション(文章)だけが表示されません。
埋め込みコードを短縮してみる
キャプション有りの場合、全コードは以下の通りとんでもなく長いですが、実際は赤色の部分のコードだけで表示することは可能です。
<blockquote class=”instagram-media” data-instgrm-captioned data-instgrm-permalink=”https://www.instagram.com/p/ClnCYGxSNJg/?utm_source=ig_embed&utm_campaign=loading” data-instgrm-version=”14″ style=” background:#FFF; border:0; border-radius:3px; box-shadow:0 0 1px 0 rgba(0,0,0,0.5),0 1px 10px 0 rgba(0,0,0,0.15); margin: 1px; max-width:540px; min-width:326px; padding:0; width:99.375%; width:-webkit-calc(100% – 2px); width:calc(100% – 2px);”><div style=”padding:16px;”> <a href=”https://www.instagram.com/p/ClnCYGxSNJg/?utm_source=ig_embed&utm_campaign=loading” style=” background:#FFFFFF; line-height:0; padding:0 0; text-align:center; text-decoration:none; width:100%;” target=”_blank”> <div style=” display: flex; flex-direction: row; align-items: center;”> <div style=”background-color: #F4F4F4; border-radius: 50%; flex-grow: 0; height: 40px; margin-right: 14px; width: 40px;”></div> <div style=”display: flex; flex-direction: column; flex-grow: 1; justify-content: center;”> <div style=” background-color: #F4F4F4; border-radius: 4px; flex-grow: 0; height: 14px; margin-bottom: 6px; width: 100px;”></div> <div style=” background-color: #F4F4F4; border-radius: 4px; flex-grow: 0; height: 14px; width: 60px;”></div></div></div><div style=”padding: 19% 0;”></div> <div style=”display:block; height:50px; margin:0 auto 12px; width:50px;”><svg width=”50px” height=”50px” viewBox=”0 0 60 60″ version=”1.1″ xmlns=”https://www.w3.org/2000/svg” xmlns:xlink=”https://www.w3.org/1999/xlink”><g stroke=”none” stroke-width=”1″ fill=”none” fill-rule=”evenodd”><g transform=”translate(-511.000000, -20.000000)” fill=”#000000″><g><path d=”M556.869,30.41 C554.814,30.41 553.148,32.076 553.148,34.131 C553.148,36.186 554.814,37.852 556.869,37.852 C558.924,37.852 560.59,36.186 560.59,34.131 C560.59,32.076 558.924,30.41 556.869,30.41 M541,60.657 C535.114,60.657 530.342,55.887 530.342,50 C530.342,44.114 535.114,39.342 541,39.342 C546.887,39.342 551.658,44.114 551.658,50 C551.658,55.887 546.887,60.657 541,60.657 M541,33.886 C532.1,33.886 524.886,41.1 524.886,50 C524.886,58.899 532.1,66.113 541,66.113 C549.9,66.113 557.115,58.899 557.115,50 C557.115,41.1 549.9,33.886 541,33.886 M565.378,62.101 C565.244,65.022 564.756,66.606 564.346,67.663 C563.803,69.06 563.154,70.057 562.106,71.106 C561.058,72.155 560.06,72.803 558.662,73.347 C557.607,73.757 556.021,74.244 553.102,74.378 C549.944,74.521 548.997,74.552 541,74.552 C533.003,74.552 532.056,74.521 528.898,74.378 C525.979,74.244 524.393,73.757 523.338,73.347 C521.94,72.803 520.942,72.155 519.894,71.106 C518.846,70.057 518.197,69.06 517.654,67.663 C517.244,66.606 516.755,65.022 516.623,62.101 C516.479,58.943 516.448,57.996 516.448,50 C516.448,42.003 516.479,41.056 516.623,37.899 C516.755,34.978 517.244,33.391 517.654,32.338 C518.197,30.938 518.846,29.942 519.894,28.894 C520.942,27.846 521.94,27.196 523.338,26.654 C524.393,26.244 525.979,25.756 528.898,25.623 C532.057,25.479 533.004,25.448 541,25.448 C548.997,25.448 549.943,25.479 553.102,25.623 C556.021,25.756 557.607,26.244 558.662,26.654 C560.06,27.196 561.058,27.846 562.106,28.894 C563.154,29.942 563.803,30.938 564.346,32.338 C564.756,33.391 565.244,34.978 565.378,37.899 C565.522,41.056 565.552,42.003 565.552,50 C565.552,57.996 565.522,58.943 565.378,62.101 M570.82,37.631 C570.674,34.438 570.167,32.258 569.425,30.349 C568.659,28.377 567.633,26.702 565.965,25.035 C564.297,23.368 562.623,22.342 560.652,21.575 C558.743,20.834 556.562,20.326 553.369,20.18 C550.169,20.033 549.148,20 541,20 C532.853,20 531.831,20.033 528.631,20.18 C525.438,20.326 523.257,20.834 521.349,21.575 C519.376,22.342 517.703,23.368 516.035,25.035 C514.368,26.702 513.342,28.377 512.574,30.349 C511.834,32.258 511.326,34.438 511.181,37.631 C511.035,40.831 511,41.851 511,50 C511,58.147 511.035,59.17 511.181,62.369 C511.326,65.562 511.834,67.743 512.574,69.651 C513.342,71.625 514.368,73.296 516.035,74.965 C517.703,76.634 519.376,77.658 521.349,78.425 C523.257,79.167 525.438,79.673 528.631,79.82 C531.831,79.965 532.853,80.001 541,80.001 C549.148,80.001 550.169,79.965 553.369,79.82 C556.562,79.673 558.743,79.167 560.652,78.425 C562.623,77.658 564.297,76.634 565.965,74.965 C567.633,73.296 568.659,71.625 569.425,69.651 C570.167,67.743 570.674,65.562 570.82,62.369 C570.966,59.17 571,58.147 571,50 C571,41.851 570.966,40.831 570.82,37.631″></path></g></g></g></svg></div><div style=”padding-top: 8px;”> <div style=” color:#3897f0; font-family:Arial,sans-serif; font-size:14px; font-style:normal; font-weight:550; line-height:18px;”>この投稿をInstagramで見る</div></div><div style=”padding: 12.5% 0;”></div> <div style=”display: flex; flex-direction: row; margin-bottom: 14px; align-items: center;”><div> <div style=”background-color: #F4F4F4; border-radius: 50%; height: 12.5px; width: 12.5px; transform: translateX(0px) translateY(7px);”></div> <div style=”background-color: #F4F4F4; height: 12.5px; transform: rotate(-45deg) translateX(3px) translateY(1px); width: 12.5px; flex-grow: 0; margin-right: 14px; margin-left: 2px;”></div> <div style=”background-color: #F4F4F4; border-radius: 50%; height: 12.5px; width: 12.5px; transform: translateX(9px) translateY(-18px);”></div></div><div style=”margin-left: 8px;”> <div style=” background-color: #F4F4F4; border-radius: 50%; flex-grow: 0; height: 20px; width: 20px;”></div> <div style=” width: 0; height: 0; border-top: 2px solid transparent; border-left: 6px solid #f4f4f4; border-bottom: 2px solid transparent; transform: translateX(16px) translateY(-4px) rotate(30deg)”></div></div><div style=”margin-left: auto;”> <div style=” width: 0px; border-top: 8px solid #F4F4F4; border-right: 8px solid transparent; transform: translateY(16px);”></div> <div style=” background-color: #F4F4F4; flex-grow: 0; height: 12px; width: 16px; transform: translateY(-4px);”></div> <div style=” width: 0; height: 0; border-top: 8px solid #F4F4F4; border-left: 8px solid transparent; transform: translateY(-4px) translateX(8px);”></div></div></div> <div style=”display: flex; flex-direction: column; flex-grow: 1; justify-content: center; margin-bottom: 24px;”> <div style=” background-color: #F4F4F4; border-radius: 4px; flex-grow: 0; height: 14px; margin-bottom: 6px; width: 224px;”></div> <div style=” background-color: #F4F4F4; border-radius: 4px; flex-grow: 0; height: 14px; width: 144px;”></div></div></a><p style=” color:#c9c8cd; font-family:Arial,sans-serif; font-size:14px; line-height:17px; margin-bottom:0; margin-top:8px; overflow:hidden; padding:8px 0 7px; text-align:center; text-overflow:ellipsis; white-space:nowrap;”><a href=”https://www.instagram.com/p/ClnCYGxSNJg/?utm_source=ig_embed&utm_campaign=loading” style=” color:#c9c8cd; font-family:Arial,sans-serif; font-size:14px; font-style:normal; font-weight:normal; line-height:17px; text-decoration:none;” target=”_blank”>やっぱ垂水やん(@yappa_tarumi)がシェアした投稿</a></p></div></blockquote> <script async src=”//www.instagram.com/embed.js”></script>
必要なコードだけ抜き出し、不必要なCSSも削除した結果のコードが以下でスッキリしました。
<blockquote class=”instagram-media” data-instgrm-permalink=”https://www.instagram.com/p/ClnCYGxSNJg/?utm_source=ig_embed&utm_campaign=loading” data-instgrm-version=”14″></blockquote><script async src=”//www.instagram.com/embed.js”></script>
「data-instgrm-version=”14″」を削除しても表示できますが、一応置いている状態です。
以下は上記のコードを埋め込んだ場合です。
※テキストで埋め込んだ後ビジュアルにするとblockquoteコードが消えてしまうので、貼り付けた後はテキストのままにする必要があります。
トップページに4つ並べて表示させてみる
カテゴリーとカスタムフィールドの設定
Instagramを表示する為のカテゴリーを作成します。
ここでは「instagram_list」としています。
カスタムフィールドはプラグインの「Advanced Custom Fields」を使用しています。
フィールド名は「instagram_post」としています。
InstagramのURLの取得
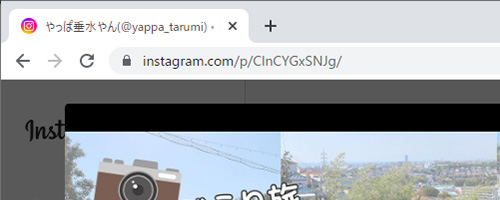
Instagramの投稿ページを開くと、アドレスバーにURLが表示されています。
WordPressの投稿ページのカスタムフィールドには、このURLの一部を入力します。
以下の場合「ClnCYGxSNJg」が入力するコードになります。
PHPとCSSの設定
既にこのサイトのトップページにも4つ並べて表示させています。
カスタマイズしているファイルは「list.php」と「style.css」です。
list.php
<?php
$arg = array(
'posts_per_page' => 4, //表示数
'category_name' => 'instagram_list', //カテゴリースラッグ
'orderby' => 'date', //表示順をWordPressの投稿日順
'order' => 'DESC' //新しい投稿を最後に
);
$insta_posts = get_posts($arg);
if($insta_posts) { ?>
<h3>今日のちょい飯(Instagram)</h3>
<ul class="new_insta_list">
<?php
foreach($insta_posts as $insta_post) {
setup_postdata($insta_post);
?>
<li><div class="insta_list_date"><?php echo mysql2date('Y.m.d', $insta_post->post_date); ?></div>
<div class="insta_list"><div class="insta_contents"><blockquote class="instagram-media" data-instgrm-permalink="https://www.instagram.com/p/<?php echo get_post_meta($insta_post->ID, 'instagram_post', true); ?>/?utm_source=ig_embed&utm_campaign=loading" data-instgrm-version="14"></blockquote><script async src="//www.instagram.com/embed.js"></script></div></div></li>
<?php } } wp_reset_postdata(); ?>
</ul>
- 3~6行目で表示する設定をします。
- 18行目でCSSのpositionを使用していますので、DIV2つで囲んでいます。
余分なHTMLやCSSクラスは削除していますので、実際に表示している内容とは少し違います。
CSSはお好みで設定してください。
以下は上記で使用しているCSSです。
style.css
ul.new_insta_list {
  display: flex;
  margin: 0 0 50px;
  padding: 0;
  justify-content: space-between;
}
ul.new_insta_list li {
  width: 24%;
  margin: 0;
  padding: 0;
  list-style: none;
}
ul.new_insta_list .insta_list_date {
  padding: 0 5px;
  font-size: 12px;
  text-align: right;
}
.insta_list {
  position: relative;
  width: 192px;
  height: 192px;
  margin: 0;
  padding: 0;
  overflow: hidden;
}
.insta_contents {
  position: absolute;
  top: -55px;
  left: -1px;
  width: 101%;
  height: 101%;
}
.insta_contents .instagram-media {
  min-width: 192px !important
}
- 20・21行目でサイズを指定していますが、34行目と同じにする必要があります。
- 34行目はInstagram側で設定されている為「!important」を入れています。
- 26行目からのクラスで位置調整をし、30・31行目はグレーの枠線を消す為に101%にしています。
表示した結果
トップページにも表示していますが、実際の表示結果が以下。
※タイトルなど付け加えた部分があります。
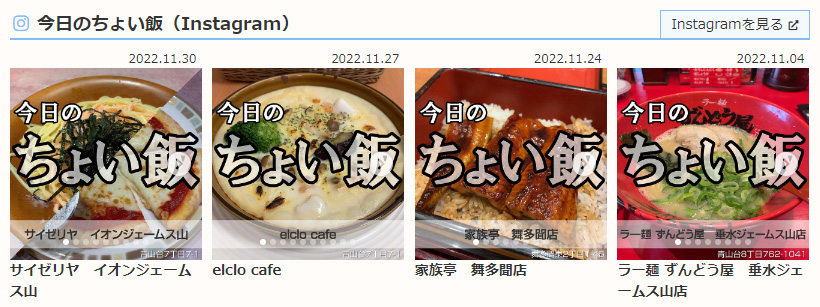
複数枚画像がある場合、ちゃんとスクロールも出来ます。
Instagramでの投稿日を調べる場合
WordPressでの投稿日時をInstagramに合わせようとする場合、Instagramで調べる必要があります。
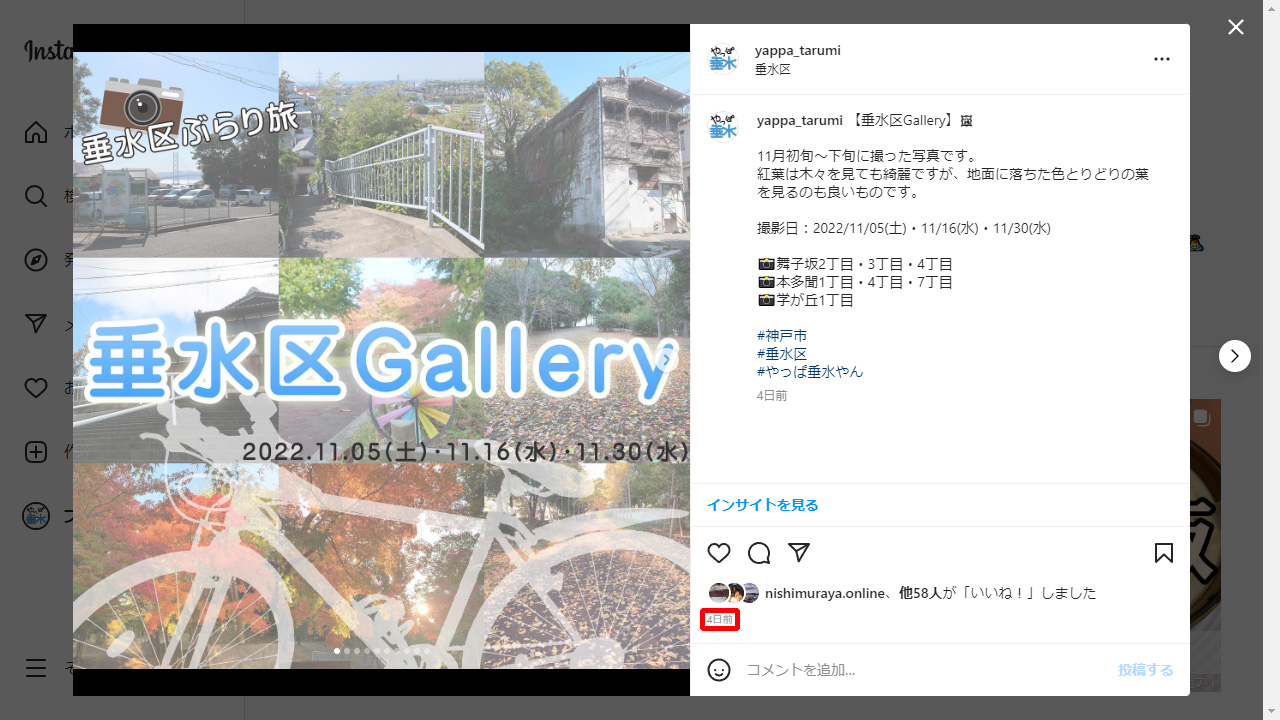
最初と同じく埋め込みたい記事を開き、□にある○日前の所を右クリックします。
※Google Chromeでおこなっています。
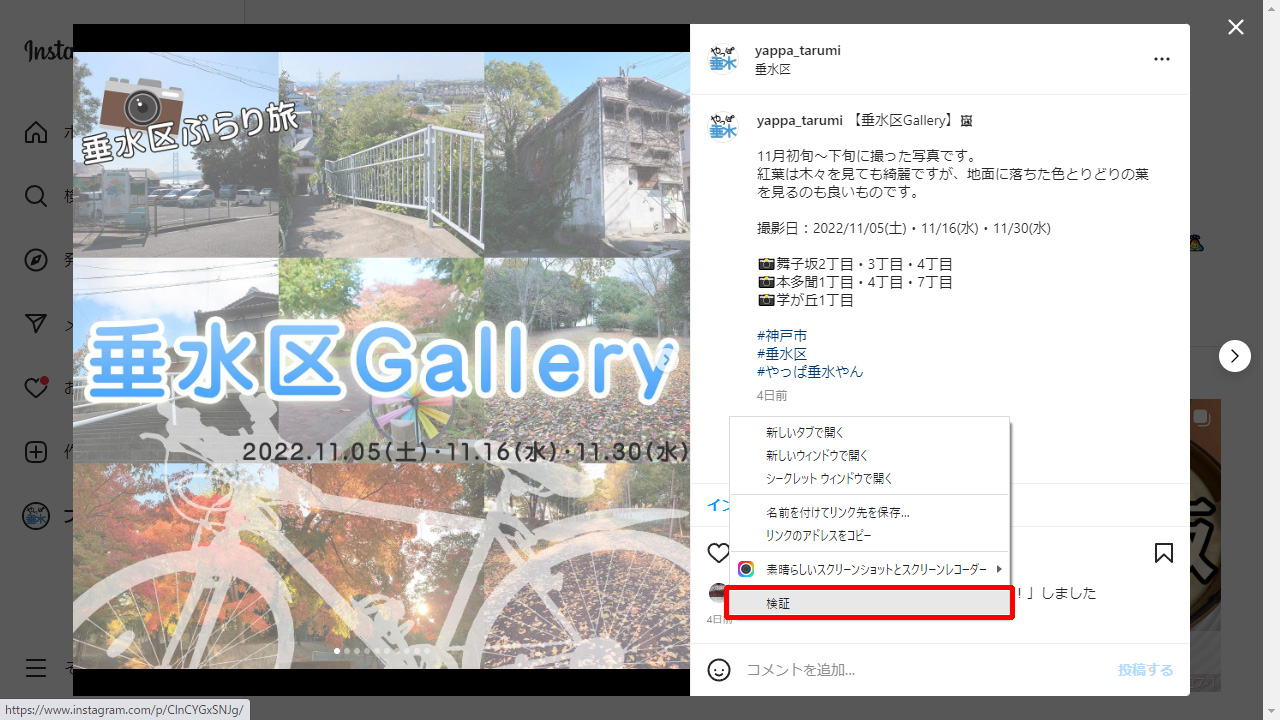
メニューが表示されるので「検証」をクリックします。
下画像のような表示になり、グレーで囲われたコードがInstagramの投稿日時になります。
この場合「2022-12-01 03:18:12」と表示されていますが、日本時間に合わせる場合は+9時間する必要があります。
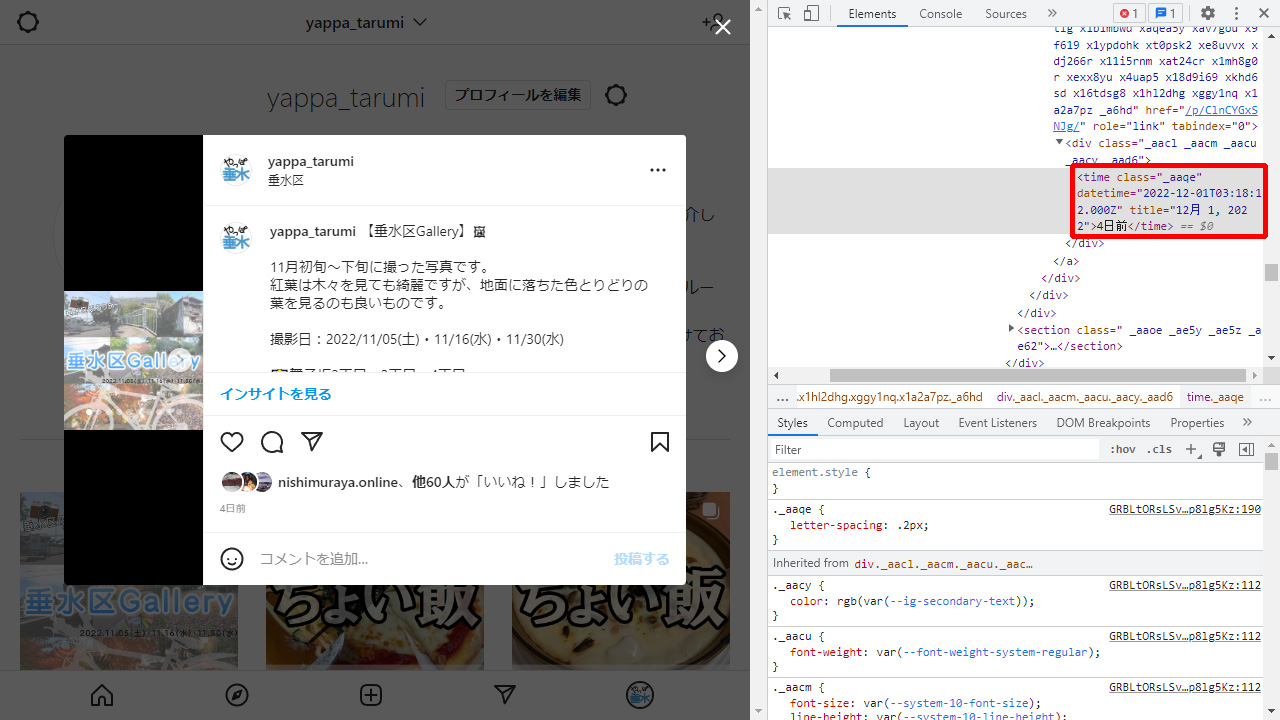
結果この投稿日時は「2022年12月1日 12時18分12秒」ということになります。
さいごに
プラグインなどを使用すればもっと簡単に表示することも可能だと思いますが、私の場合Instagramの投稿全てではなく、自分で選んだ投稿だけカテゴリー別に表示させたく色々試行錯誤してみました。
因みにスマホで表示する場合は、PHPとCSSにコードを追加しなければいけない為あしからず。





コメント