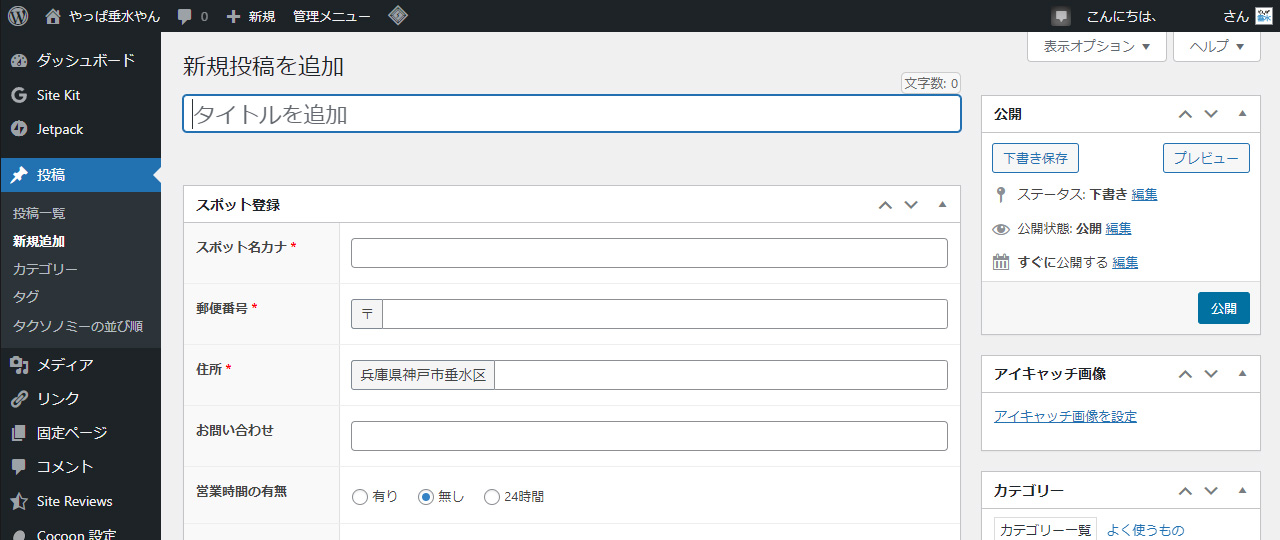
「やっぱ垂水やん」のスポットページは全てカスタムフィールドで作成しています。
さいしょに
投稿画面はこんな感じです。
本文入力フィールド(コンテンツエディタ)は非表示にしています。
今更ながら落とし穴を1つ見つけまして、全てカスタムフィールドで作成してしまうとメタタグのDescriptionが無い状態になってしまいます。
このDescriptionタグは、Google等で検索した際説明文として表示されるタグになっています。
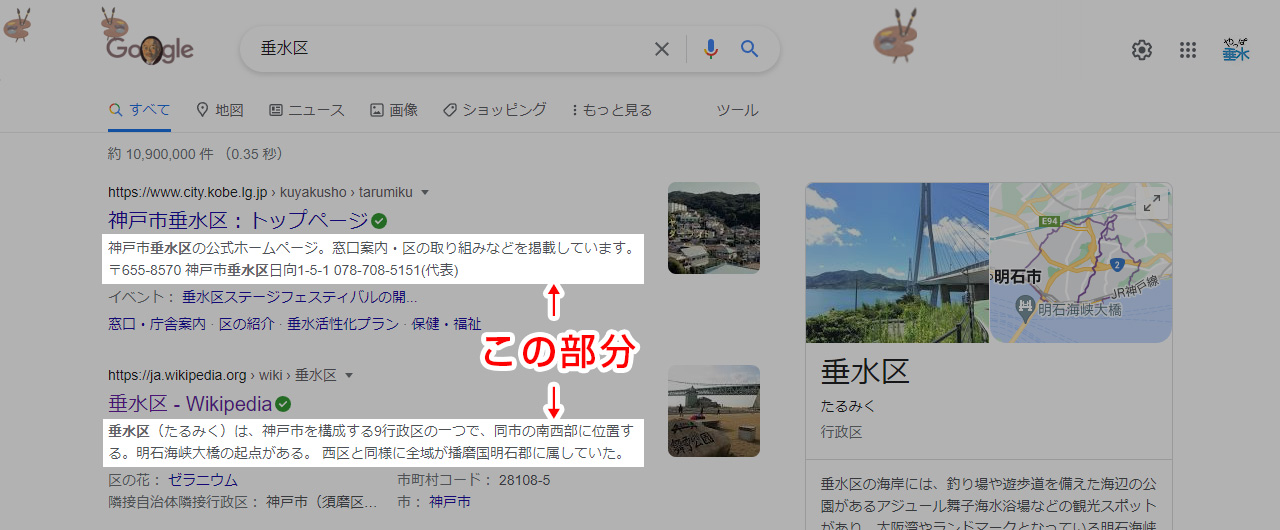
普通のブログ等は本文の先頭部分が自動的に抽出されますが、カスタムフィールドだとそうもいきませんので、PHPファイルにDescriptionタグを手動で入れる必要があります。
触るPHPファイルは4つです。
- functions.php
- tmp/json-ld.php
- tmp/header-twitter-card.php
- tmp/header-ogp.php
functions.phpが必要なのは「lib」フォルダ内のPHPファイルだった為です。
(libフォルダ内のファイルはコピーしても子テーマ側は反映されません)
では1つずつPHPファイルにコードを記述していきます。
「functions.php」への追加コード
マスターの「lib/seo.php」の一部分をfunctions.phpにコピーして書き換えます。
書き換え前(seo.php/458~469行目をコピペ)
//メタディスクリプションタグを出力する
add_action( 'wp_head', 'generate_meta_description_tag' );
if ( !function_exists( 'generate_meta_description_tag' ) ):
function generate_meta_description_tag() {
  $description = get_meta_description_text();

  if ($description && !is_wpforo_plugin_page()) {
    echo '<!-- '.THEME_NAME_CAMEL.' meta description -->'.PHP_EOL;
    echo '<meta name="description" content="'.esc_attr($description).'">'.PHP_EOL;
  }
}
endif;
書き換え後(functions.php/好きな所)
//メタディスクリプションタグを出力する
add_action( 'wp_head', 'generate_meta_description_tag' );
if ( !function_exists( 'generate_meta_description_tag' ) ):
function generate_meta_description_tag() {
  if(in_category(array('spot_blog', 'personal_blog'))) {
    $description = get_meta_description_text();
  } else {
    $description = "表示する文";
  }
  //$description = get_meta_description_text();
  if ($description && !is_wpforo_plugin_page()) {
    echo '<!-- '.THEME_NAME_CAMEL.' meta description -->'.PHP_EOL;
    echo '<meta name="description" content="'.esc_attr($description).'">'.PHP_EOL;
  }
}
endif;
上記の5~9行目が追加コードで、10行目をコメントアウトしています。
5行目はカテゴリースラッグで分岐させています。
スポットブログ・個人ブログの時はそのまま、それ以外の時は手動でのコード(文面)と言った具合です。
実際私の場合は、スポット名(カナ)・住所・電話番号を表示させたので、以下のようなコードになります。
$description = "「" . get_the_title() . "(" . get_field('spot_name_kana') . ")」のスポット紹介ページです。【住所】" . get_field('yuubin') . " 兵庫県神戸市垂水区" . get_field('address') . "【お問い合わせ】" . get_field('tel');
}
通常カスタムフィールドを表示させるのは「the_field(‘…’);」と書きますが、ここでは「get_field(‘…’);」を使いましょう。
内部リンクのブログカードで説明文を表記させたい方用
「lib/blogcard-in.php」のコードをfunctions.phpに追加変更します。
書き換え前(blogcard-in.php/44~190行目をコピペ 以下81~85行目抜粋)
//記事本文の抜粋文を取得
if (!$snippet) {
  $snippet = get_content_excerpt($post_data->post_content, get_entry_card_excerpt_max_length());
}
$snippet = preg_replace('/\n/', '', $snippet);
書き換え後(functions.php/好きな所 抜粋部分のみ表示)
//記事本文の抜粋文を取得
if (!$snippet) {
  if(in_category(array('spot_blog', 'personal_blog'))) {
    $snippet = get_content_excerpt($post_data->post_content, get_entry_card_excerpt_max_length());
  } else {
    $snippet = "表示する文";
  }
//$snippet = get_content_excerpt($post_data->post_content, get_entry_card_excerpt_max_length());
}
$snippet = preg_replace('/\n/', '', $snippet);
上記の3~7行目が追加コードで、8行目をコメントアウトしています。
「tmp/json-ld.php」への追加コード
後のPHPファイルはfunctions.phpで追加したコードを貼り付けるだけです。
書き換え前(103行目~)
"description": "<?php
  $description = get_meta_description_text();
  $description = str_replace('\\', '', $description);
  echo esc_attr($description);
?>…"<?php // 抜粋 ?>
書き換え後
"description": "<?php
  if(in_category(array('spot_blog', 'personal_blog'))) {
    $description = get_meta_description_text();
  } else {
    $description = "表示する文";
  }
  //$description = get_meta_description_text();
  $description = str_replace('\\', '', $description);
  echo esc_attr($description);
?>…"<?php // 抜粋 ?>
上記の2~6行目が追加コードで、7行目をコメントアウトしています。
「tmp/header-twitter-card.php」への追加コード
同じくfunctions.phpで追加したコードを貼り付けるだけです。
書き換え前(12行目~)
<?php
$description = get_meta_description_text();
if (is_singular()){//単一記事ページの場合
  $title = get_the_title();
  if ( is_front_page() ) {
    $title = get_bloginfo('name');
  }
  $url = get_the_permalink();
書き換え後
<?php
if(in_category(array('spot_blog', 'personal_blog'))) {
  $description = get_meta_description_text();
} else {
  $description = "表示する文";
}
//$description = get_meta_description_text();
if (is_singular()){//単一記事ページの場合
  $title = get_the_title();
  if ( is_front_page() ) {
    $title = get_bloginfo('name');
  }
  $url = get_the_permalink();
上記の2~6行目が追加コードで、7行目をコメントアウトしています。
「tmp/header-ogp.php」への追加コード
同じくfunctions.phpで追加したコードを貼り付けるだけです。
書き換え前(10行目~)
<!-- OGP -->
<meta property="og:type" content="<?php echo (is_singular() ? 'article' : 'website'); ?>">
<?php
$description = get_meta_description_text();
if (is_singular()){//単一記事ページの場合
書き換え後
<!-- OGP -->
<meta property="og:type" content="<?php echo (is_singular() ? 'article' : 'website'); ?>">
<?php
if(in_category(array('spot_blog', 'personal_blog'))) {
  $description = get_meta_description_text();
} else {
  $description = "表示する文";
}
//$description = get_meta_description_text();
if (is_singular()){//単一記事ページの場合
上記の4~8行目が追加コードで、9行目をコメントアウトしています。
これでおそらく検索画面やTwitterカードにも説明文(Description)が表示されると思います。

コメント